
Around 70% of people with no prior coding experience built a working app within one month of starting on a no-code platform. That stat comes from industry research tracking actual adoption, not marketing copy. But Bubble.io has a reputation for being the hardest no-code tool to learn. That reputation isn’t entirely wrong. And it isn’t because Bubble is poorly designed.
The real problem is how most bubble.io tutorials teach it. They open the editor, point at menus, and walk you through clicking things in sequence. Follow a tutorial well enough and you can reproduce exactly what the tutorial builds. Try to build something different and you’re back to square one.
This guide takes a different path. Start with the mental model — Bubble’s five core concepts — and every tutorial you watch after this one becomes much easier to apply. You’ll understand what’s happening under the hood, not just which button to press.
What Is Bubble.io, and Why Does It Matter Right Now?
Bubble.io is a full-stack no-code platform. That phrase gets used loosely, so being precise matters: Bubble covers frontend design, backend logic, database structure, user authentication, API integrations, and hosting in a single visual environment. No HTML. No JavaScript. No external server to configure.
That’s different from website builders like Wix or Webflow. Those tools are built for static websites and content-driven pages. Bubble is built for web applications: software that reads and writes data, handles user accounts, processes payments, runs business logic, and responds to events. A SaaS product, a client portal, a marketplace, an internal tool for your team — that’s Bubble territory. A landing page is not. If you’re still deciding whether Bubble is the right choice for your project, our guide on which no-code app builder to use can help narrow it down.
The timing matters. The global no-code development platform market is on track to hit $52 billion in 2026. Gartner has forecasted that 80% of technology products will be built by non-developers by 2026. Bubble sits at the center of that shift.
Platform scale reflects the momentum. Bubble’s platform now hosts nearly 7 million apps built by 6 million users worldwide; those apps processed over $1 billion in transactions in the past year alone. Real companies have scaled on it. Teal, a career management platform, reached 2 million members. Flexiple, a freelance talent marketplace, processed over $6 million in transactions on a tech stack costing $100 per month.
Learn bubble no code correctly and this platform can carry your product from idea to real users without a developer involved.
The Five Core Concepts: Bubble’s Mental Model
Most bubble tutorials skip straight past this. They go to “click here, drag that, press this button.” That works for reproducing one tutorial. It doesn’t work for building anything you haven’t seen before.
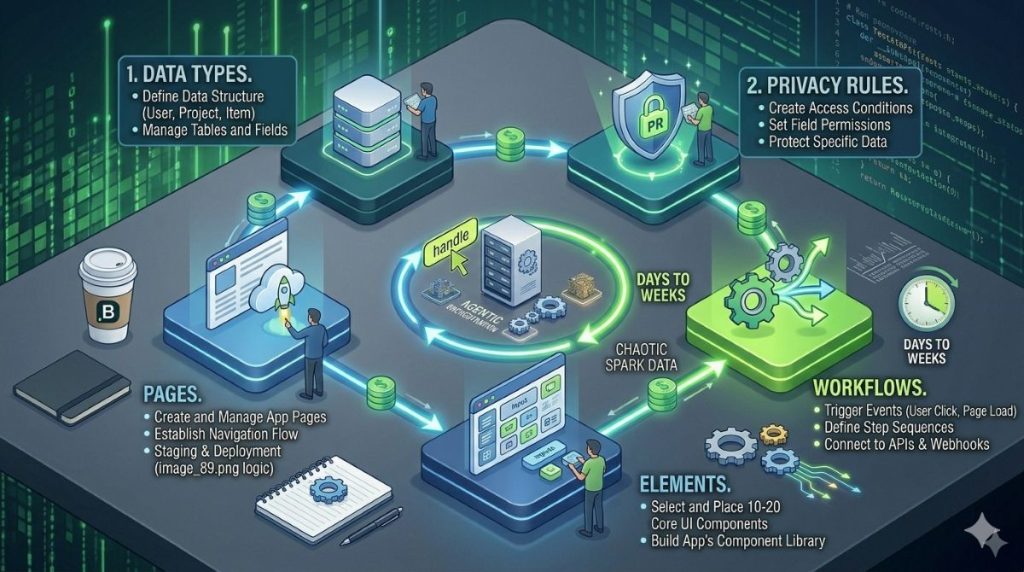
Bubble has five core concepts. Everything in every app you build on this platform connects back to them.
1. Data Types
Data types are your database tables. Every piece of information your app stores lives in a data type.
A task management app needs a Task data type. A marketplace needs Listing and Order. Each data type has fields, which work like columns in a spreadsheet. A Task might have: title (text), is_done (yes/no), created_by (User), due_date (date). Build these in the Data tab before touching the design canvas.
2. Privacy Rules
Privacy rules determine who can see what data. They run server-side on every database query.
Without them, every logged-in user can see every other user’s records. This is the most common beginner mistake. Build an app, test it with one account, and miss that every other user can see the same data. Set privacy rules before building any UI. A basic rule for the Task type looks like this: allow access only when This Task's created_by = Current User.
3. Workflows
Workflows are Bubble’s logic engine. They define what happens when an event occurs.
A button click triggers a workflow. A form submission triggers a workflow. A single workflow is a chain of actions: create a database record, send an email, navigate to a page, refresh a list. Workflows live in the Workflow tab. No code involved.
4. Elements
Elements are everything visible on screen. Buttons, text boxes, input fields, images, and repeating groups (which show lists of database records).
Elements handle styling and positioning. They don’t contain logic. Logic lives in workflows. A button is just a button until a workflow connects it to an action.
5. Pages
Pages are screens in your app. Each page has its own URL, its own elements, its own data source, and its own workflows. A simple app might have three: an index page (login/signup), a dashboard (main view), and a settings page.
How They Connect?
Here’s the circuit that runs every Bubble app:
Element triggered → Workflow fires → Database reads or writes → Privacy Rules run → Data displays on Page
A user clicks “Add Task.” A workflow creates a Task record. The privacy rule confirms permission. The task list on the dashboard refreshes.
Understanding this loop is what separates following tutorials from building on your own. Appearance and logic are completely separate in Bubble. Redesign every element on a page and the workflow behind it stays untouched. Rewrite the workflows and not a single pixel of the UI changes. For a Smart Admin, that’s the key insight.
How to Get Started? Setting Up Your First Bubble App
Go to bubble.io and create a free account. Click “Get started for free” and name your blank app something practical. The free plan covers everything you need for this bubble.io beginner tutorial 2026. No credit card required.
Navigating the Editor Tabs
The editor has four main areas. You’ll use all of them in every bubble io tutorial you follow:
- Design — the canvas, where you place and style elements
- Workflow — the logic layer, where you define what happens on events
- Data — where you create data types, set fields, and configure privacy rules
- Plugins — where you add payment tools, email services, maps, and API connectors
A fifth tab worth knowing early: Logs. It shows live workflow runs and errors. When something breaks — and it will — Logs tells you where.
One piece of advice most guides skip: open the Data tab first, not Design. Build your data model before you touch the UI. This is how experienced Bubble builders start every project. It prevents rebuilding your database after wiring up fifty workflows.
If you want a faster starting scaffold, Bubble’s AI generator is worth knowing about. Describe your app concept in plain language and it generates pages, data models, and workflows in roughly 5–7 minutes. Useful for studying how a type of app is typically structured — not a substitute for building it yourself. Many creators also share their experiences with Bubble across independent tech publications, including the Fappening blog, though official documentation should remain your primary reference.
Build Your First App: A 60-Minute Task Manager Walkthrough
This walkthrough builds a real working app with user login, a live database, and full create/read/update operations. Same five concepts as above, in practice.
Step 1: Create Your Data Type (5 minutes)
Data → Data types → New type: Task
Add four fields:
title— type: textis_done— type: yes/no, default: nocreated_by— type: User (confirm the auto-generated field)due_date— type: date
Four fields is enough. Don’t over-build the data model while learning.
Step 2: Set a Privacy Rule (5 minutes)
Data → Privacy → Task → Add rule
Condition: This Task's created_by = Current User
Enable: Find in searches, View all fields, Edit, Delete. Remove any default “Everyone” rule.
This takes five minutes and closes a serious security gap. Every data type in a real app needs a privacy rule.
Step 3: Build the UI (20 minutes)
Index page: Remove placeholder content. Drag in Bubble’s built-in Signup/Login element from the Account category in the element panel.
Dashboard page (create new): Add a text input for the task title. Add a button labeled “Add Task.” Below that, add a Repeating Group: Type of content → Task, Data source → Current User's Tasks. Inside the Repeating Group cell, add a text element with content set to Current cell's Task's title.
Step 4: Wire Up the Workflows (20 minutes)
Click the “Add Task” button, then click Start/Edit Workflow. Add three actions:
- Create a new Task — title set to
Input's value, created_by set toCurrent User - Reset inputs — clears the title field
- Refresh data on the Repeating Group
For the login flow: when a user logs in or signs up, add a Navigate to Page → dashboard action.
Step 5: Test and Deploy
Use Run mode (top bar play button) to test in the browser. Create a test user, add tasks, then test with a second account. Verify the second account can’t see the first user’s tasks. That privacy rule from Step 2 is running invisibly on every query.
When you’re ready to go live, the Starter plan handles deployment. Free plan is enough for everything up to that point.
This five-step sequence — define data, set privacy, build display, add workflow, test — applies to any Bubble app regardless of complexity. When you’re ready to move from learning to shipping, our breakdown of the best no-code platforms for MVPs compares how Bubble stacks up against other launch-focused tools.
Your Bubble.io Learning Path: From Zero to Shipped
Most Bubble.io tutorial lists hand you a pile of links and call it a curriculum. This one doesn’t. What follows is a four-stage progression — each stage has a clear outcome, a realistic time estimate, and the specific resources that fit that stage. Work through them in order or drop into the stage that matches where you are now.
Stage 1: Orientation
What you’ll be able to do after this stage: Work across all four editor tabs without confusion, explain Bubble’s five core concepts without looking them up, and reproduce the task manager walkthrough in this guide from memory — without a tutorial open.
Start with Bubble Academy (free, official). Work through the interactive Task Manager and Marketplace tutorials first. They cover the exact concepts in this guide with step-by-step checks. The Bubble Manual introduction is worth reading alongside it — the docs cover everything from basic concepts through advanced features, and reading them early builds vocabulary that makes every tutorial faster to follow.
Realistic time: 6–10 hours of focused practice.
Stage 2: Foundations
What you’ll be able to do after this stage: Build a complete app with user authentication, a working database with privacy rules, and at least one workflow that calls an external API.
Set aside a separate session for Bubble’s API Connector. That’s the tool you’ll use to connect Bubble to Stripe, OpenAI, Twilio, or any external service. It has its own learning curve outside the core editor. For structured coverage of production-level patterns — data modelling for scale, privacy rules beyond the basics, Workload Unit management — the Complete Bubble Developer course by Leon Petrou on Udemy is worth the investment.
Realistic time: 8–15 hours spread across two to three weeks. Anyone claiming an afternoon is describing a pre-built template with minimal changes.
Stage 3: Project Build
What you’ll be able to do after this stage: Ship a working app to real users. Debug using the Logs tab. Handle edge cases. Connect a payment processor. Know when your data model needs to be redesigned before it breaks under load.
This is where most beginners stall — they can follow tutorials but freeze when something doesn’t work as expected. The Airdev free bootcamp is useful at this stage because it covers client-facing builds with real edge cases. Bubble’s AI Agent (launched October 2025 and rolling out to all apps by June 2026) becomes genuinely useful here too. Co-CEO Emmanuel Straschnov described it in a February 2026 community AMA as a contextual teacher: rather than leaving beginners to search for answers, the Agent can interact on a context basis — walking you through fixes specific to your app rather than pointing at generic documentation. It won’t replace understanding the platform. It does shorten the gap between “something’s broken” and “I know why.”
Realistic time: 3–6 weeks of part-time study before a production-ready app is achievable. If you’re weighing Bubble against FlutterFlow or Glide for your product, see our full Bubble vs FlutterFlow vs Glide comparison.
Stage 4: Specialisation
What you’ll be able to do after this stage: Take on freelance clients or an in-house Bubble developer role, build native iOS and Android apps, or architect a SaaS product that scales past early traction.
Freelancing means building to a client’s spec, under time pressure, with edge cases no course prepared you for. The Coaching No-Code Apps program covers client-facing builds with that in mind. The Bubble Developer Certification is worth pursuing before charging clients — it’s an official credential that signals competence in a market where anyone can call themselves a Bubble developer. The next section covers native mobile app building specifically, which is where most serious freelance and product work is heading.
Realistic time: 3–6 months of consistent building before charging clients with confidence.
Building a Mobile App with Bubble.io
At Bubble Tour 2025, co-CEO Emmanuel Straschnov announced that apps built on Bubble had processed over $1 billion in transactions — and by early 2026, the share of new Bubble projects being built for mobile versus web was, in his words, “pretty close, actually.” Mobile isn’t an upcoming feature on a roadmap. It’s half the platform now.
Bubble’s native mobile builder runs on React Native under the hood, but the entire development process stays inside Bubble’s visual editor. No separate codebase. No context switching. No new framework to learn on top of everything else you’re already picking up. You design screens, wire navigation, and submit native builds to the App Store and Google Play without leaving the platform.
Web vs. Mobile: The Key Differences for Beginners
The backend is the same. Your database, workflows, privacy rules, and API connections work across both your web and mobile apps. You’re not rebuilding the logic layer. Only the UI layer changes.
The main conceptual shift: web apps use Pages. Mobile apps use Views. Same idea — different elements, different navigation patterns. Mobile Views expect swipe gestures, bottom sheets that slide up from the screen’s edge, and navigation stacks. A tap on “Back” on a phone should feel like a real back button, not a page reload.
One thing no competitor guide mentions clearly enough: there’s no automatic conversion from a Bubble web app to a mobile app. Every screen must be rebuilt using mobile-specific elements. The backend transfers automatically. The frontend does not. Plan for this before you start — knowing it upfront saves the frustration of discovering it halfway through.
What Mobile Gives You That the Web Version Can’t
Native apps get direct access to the hardware. Four capabilities matter most for the kinds of apps beginners build on Bubble:
Camera and photo library — users can capture photos or upload from their library. The Take Photo and Pick Photo workflow actions trigger the permission prompt automatically.
Location services — the Get Current Location workflow action pulls the device’s GPS coordinates. Useful for delivery apps, field service tools, event check-in apps, and anything proximity-based.
Push notifications — the most underrated feature for retention. Use the Request Push Notification Permission action early in your onboarding flow, then Send Push Notification anywhere a workflow runs. You can route the tap to a specific View with parameters.
In-app purchases — Bubble added App Store and Play Store in-app purchase support at Bubble Tour 2025. For subscription products and paid mobile tools, this closes a gap that previously required third-party workarounds.
Beginner Checklist: Your First Bubble Mobile Build
- Build and validate your core data model on the web app first. The backend transfers; the UI doesn’t. Get the data right before rebuilding screens.
- Enable the mobile canvas via the app interface manager in the editor toolbar. Your project already exists — you’re adding a mobile layer to it.
- Rebuild your key screens using mobile Views. Use bottom sheets for selection menus and swipe actions on list items — both feel native in a way that dropdowns never do on a phone screen.
- Add the Request Push Notification Permission action to your onboarding flow. Do this early; users are less likely to grant it mid-session.
- Preview on a real device using the Bubble Go app, not just the browser preview. The two don’t always match, and discovering layout issues in browser preview alone wastes testing time.
- When ready to publish: the Apple App Store requires an Apple developer account ($99/year). Google Play requires a $25 one-time fee. Both stores review your app before it goes live — first individual submissions typically take 1–3 days.
An Honest Assessment
The mobile builder is newer and less mature than Bubble’s web editor. Documentation is thinner in places, some community plugins haven’t yet been ported to mobile (Bubble’s mobile plugin builder — allowing developers to create mobile-specific plugins — was targeted for early 2026), and the forum’s question base for mobile issues is smaller than for web. These are real limitations for a beginner.
Worth the context, though: at Bubble Tour 2025 in London, the organiser of a UK tech conference described publishing to both app stores as something they “never thought would be possible” given the typical cost and timeline. They built it without a dedicated mobile development team. That’s the gap this builder closes — and it’s getting better fast.
Bubble in 2026: AI Features and the Mobile Builder
Two platform changes from 2025 are worth knowing before you start.
Native Mobile Builder — Bubble launched native iOS and Android app building in June 2025. It runs on a React Native base and gives you device access: camera, GPS, push notifications, biometric login. The mobile builder shares the same database and backend as your web app. You don’t need a separate tool to get a native mobile experience anymore. Both platforms live in the same project.
For a complete walkthrough of building your first native mobile app — including the beginner checklist and the key limitations to know upfront — see the section above.
AI App Generator — Describe your app concept in plain language. Bubble generates a working prototype in roughly 5–7 minutes, including pages, layouts, data types, and workflows. Useful for studying how a given app type is structured.
In October 2025, Bubble launched the Bubble AI Agent — a tool that understands your specific app, uses natural language instructions, and generates or edits elements following Bubble best practices. As of June 2026, it’s rolling out to all existing Bubble apps. The honest assessment on both AI tools: useful for prototyping and for beginners getting unstuck. Not reliable for production security without a manual privacy rules review. Privacy rules get skipped. Data models are generic. Gaps require manual fixes. Treat the output as a starting scaffold, not a finished product. Data models are generic. Gaps require manual fixes. Treat the output as a fast learning scaffold, not a finished product.
The workflow builder also supports calling AI APIs directly through the API Connector, so adding OpenAI or Anthropic features to your app doesn’t require a separate plugin. For a broader view of the AI-native no-code landscape, our roundup of the best no-code AI platforms is worth a read alongside this guide.
Bubble.io Pricing: What You Actually Need
Bubble pricing in 2026 for web-only plans, billed annually:
- Free — learn and prototype, no live deployment
- Starter — $69/month, live deployment, custom domain, 175,000 WUs
- Growth — $249/month, dedicated server, removes Bubble branding, 2 editors
- Team — $649/month, 5 editors, 500,000 WUs, advanced version control
The Part Beginners Always Miss
Workload Units (WUs) measure server processing. Page loads, database queries, workflow triggers, and API calls all consume WUs from your monthly allocation.
The base plan price is not the full cost of running a live app. A Starter plan app realistically costs $80–$150/month once plugins, email services, and payment tools are added. Plan for that before choosing a tier.
Practical guidance: stay on Free while learning. Move to Starter when deploying a live app. Move to Growth when you have paying customers or need white-labeled branding.
What Bubble Can’t Do? Honest Limitations
Bubble.io training guides rarely state this plainly. Here it is.
Bubble is not the right tool for apps needing extremely low latency — trading platforms, real-time gaming, or millisecond-level data work. It’s not built for complex games with physics engines. Apps built on Bubble need an internet connection. There’s no offline mode. And there’s no source code export. Your app’s logic lives on Bubble’s servers. Data is portable; the code is not.
Performance is worth understanding clearly. A well-built Bubble app handles serious traffic — the 2M-user and $1B-transaction examples earlier are real. A poorly designed one struggles at 500 users. The gap is usually in data modeling and query design, not in the platform itself.
Organizations using no-code tools report 65–70% faster process cycle times (Kissflow/Forrester, 2026) than traditional approaches. That gain is real — but it comes after the learning curve, not before it. Bubble io tutorials promising “build your app this weekend” are describing a simple template-based project.
Where Bubble’s capability is consistently underestimated is the workflow and plugin layer. The visual workflow builder handles conditionals, list filtering, scheduled background jobs, server-side actions, and direct API calls — the same patterns that would take hundreds of lines of code to replicate in a traditional stack. The plugin ecosystem extends this further: payment processing via Stripe, transactional email via SendGrid or Mailgun, AI features via the OpenAI or Anthropic API Connector, analytics via Mixpanel, and mapping via Google Maps all connect without writing a single line of code. The nuance worth understanding is that “no code” doesn’t mean no logic — it means the logic is expressed visually, in steps a non-developer can read and change. That’s a real difference from traditional tooling, and it’s why Bubble apps can do things that surprise people who’ve only seen simpler no-code tools.
Bubble is the right tool for web apps that need logic, data, and user accounts — built by people who are not developers. That’s a wide and genuinely useful category. Knowing what falls outside it is just as important as knowing what falls inside.
The Path Forward
Understanding the five core concepts — data types, privacy rules, workflows, elements, and pages — is what separates beginners who need a tutorial for every new feature from those who can figure things out alone. The circuit (element triggers workflow, workflow writes data, privacy rules run, page shows result) is the foundation of every Bubble app.
In 2026, visual programming skills are becoming broadly valuable. Non-developers who can model data, wire logic, and connect APIs are in demand on product teams, in operations roles, and in freelance work. The no-code skill set now sits roughly where knowing SQL or Excel sat a decade ago — useful across many jobs and still underestimated by most people who haven’t learned it.
Start on the Free plan. Work through the task manager build. Pick a learning path based on your goal. The foundation is solid from here. For context on where no-code fits in the broader software development landscape, our primer on low-code and no-code app development covers the fundamentals.
Frequently Asked Questions
Yes. Bubble’s free plan gives you full access to the editor and all four tabs. You can build and test apps in the browser at no cost. The free plan doesn’t allow live deployment or a custom domain — but neither is needed for learning. The entire 60-minute build in this guide works on the free plan. When you’re ready to take an app live, the Starter plan starts at $29/month.
It depends on your goal. A simple internal tool typically takes 8–15 hours of active learning. A production-ready MVP to ship to paying customers realistically takes 3–6 weeks of part-time study. Working as a paid Bubble freelancer typically requires 3–6 months of consistent building before client projects are manageable. Anyone promising days is describing a narrow, template-based project.
Yes, as of June 2025. Bubble launched a native iOS and Android builder running on a React Native base. It gives you access to device capabilities including camera, GPS, push notifications, and biometric authentication. The mobile builder shares the same backend database as your web app. Mobile plans start at $42/month with annual billing. Web apps also work well on mobile browsers without the mobile plan — native device features are the specific reason to add it.
Not right away. The API Connector connects Bubble to external services like Stripe, Twilio, and OpenAI. For your first few apps, built-in plugins cover most common services without manual setup. Once you need a custom connection or a service without a dedicated Bubble plugin, set aside focused time for the API Connector. It has its own workflow and takes a few hours to understand well.
A workflow is logic you build inside your app. It defines what happens when an event occurs — button clicked, form submitted, user logged in. A plugin is a pre-built add-on that extends what Bubble can do: a payment plugin connects to Stripe, a maps plugin adds Google Maps, an email plugin connects to Mailchimp. Plugins add new workflow actions and new elements to the editor. Workflows use those actions; plugins supply them.
Your existing Bubble web app is already a project. Open the app interface manager in the editor toolbar, add a mobile app to the project, and both will share the same backend — database, workflows, and API connections carry over automatically. The UI must be rebuilt from scratch using mobile Views and mobile elements, since web pages and mobile Views are separate building blocks. Start by enabling the mobile canvas, then rebuild one screen at a time rather than trying to migrate everything at once.