
In today’s fast-paced digital world, where every second counts, the speed and performance of your website can make or break your online success. Imagine the frustration of potential customers navigating away from your site because it takes too long to load. It’s not just about losing traffic; it’s about losing opportunities for growth and engagement. The solution? Image Optimization Hacks. By fine-tuning how images are handled on your site, you can drastically enhance its performance, ensuring that visitors stay longer and engage more deeply.
Consider this: according to recent studies, a 100-millisecond delay in page load time can lead to a 7% reduction in conversions. That’s a staggering number that underscores the importance of optimizing every aspect of your website, especially when it comes to images, which often take up the most bandwidth. In this blog post, we’ll delve into some crucial image optimization hacks that can revitalize your website’s speed and efficiency. Not only will these strategies help improve user experience, but they will also give you an edge in the competitive digital landscape.
The “Heavy Image” Crime: Why SEO is Visual?
Image optimization hacks are crucial in the digital landscape to enhance site performance. With Google’s “Core Web Vitals” like LCP heavily influenced by image loading speed, focusing on SEO through visual elements is paramount. The crime of “Heavy Image” occurs when large files slow down loading times, affecting user experience and search engine rankings. To combat this, achieving “Visual Parity” is key – providing stunning visuals to users while ensuring backend files are small for quick loading.
Implementing image optimization hacks not only boosts site performance but also aligns with SEO best practices. By decreasing image sizes without compromising quality, websites can offer seamless user experiences and improve search engine visibility. Prioritizing visual content optimization is not just a trend but a necessity in the competitive online sphere where speed and aesthetics go hand in hand.
The 6 “Smart Admin” Image Hacks
Discover six ingenious “Smart Admin” image hacks to optimize your website’s performance. Implementing these image optimization hacks is crucial for enhancing site speed and user experience. These hacks will significantly boost your site’s loading time and overall performance. Let’s get started.
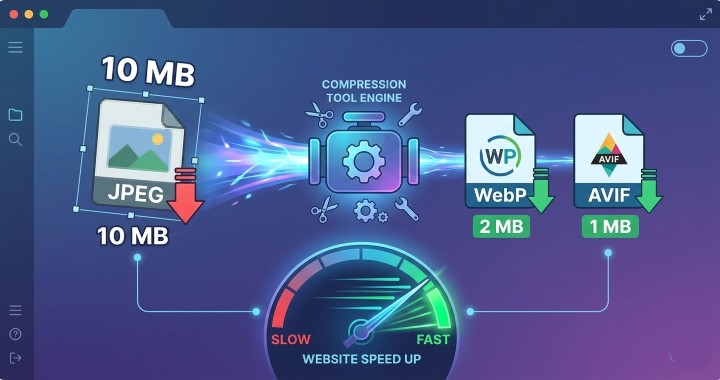
Hack 1: The “Next-Gen” Standard (WebP & AVIF)
Upgrade your image optimization game with the first hack: The “Next-Gen” Standard, leveraging WebP & AVIF formats. While JPEG served us well for three decades, it’s time to embrace newer technologies. WebP, for instance, offers a 30% reduction in file size without compromising quality, ensuring faster load times for your website. To streamline this process, consider tools like ShortPixel or EWWW Optimizer for seamless format conversion without manual intervention.
Embracing the “Next-Gen” image standards isn’t just a trend; it’s a necessity for boosting site performance. By implementing these optimization hacks, such as utilizing WebP & AVIF formats, you can significantly enhance your website’s loading speed and overall user experience. Automate the conversion process with reliable tools to effortlessly integrate these advanced formats into your image optimization strategy.
Hack 2: The “2500px” Ceiling
When focusing on image optimization hacks, understanding the “2500px” ceiling is crucial. In 2026, most monitors don’t require images wider than 2500px. For impactful hero images, limit the width to 2500px, ensuring compatibility across devices. However, for blog content, aiming for a width of 1200px hits the sweet spot between quality and performance.
Optimizing images under the “2500px” ceiling not only enhances site performance but also ensures seamless user experience. By following this smart tip, websites can maintain speed and efficiency, catering to modern monitor standards. Embracing this approach is key to boosting site performance and staying ahead in the digital realm.
Hack 3: “Lossy” vs. “Lossless” Compression
When optimizing images for the web, understanding the distinction between “Lossy” and “Lossless” compression is crucial. “Lossy” compression cleverly eliminates data that the human eye can’t perceive, making image files smaller without compromising visible quality. This method is ideal for web content, where fast loading times are paramount.
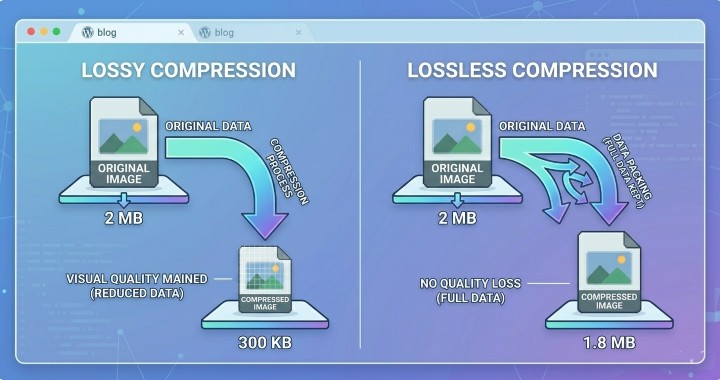
On the other hand, “Lossless” compression retains all image data, making it suitable for high-end photography portfolios that require utmost precision. For boosting site performance, choosing “Lossy” compression for everyday web images is the smart verdict. Reserve “Lossless” compression for instances where every pixel’s integrity is paramount to convey your visual message effectively. Understanding when to apply each compression type ensures optimal image optimization for your website.
Hack 4: “Lazy Loading” (The Procrastination Hack)
Lazy Loading” is a clever tactic under the Image Optimization Hacks umbrella that emphasizes efficiency. The rationale is clear: why burden the user with loading images they might not even see? By implementing “Lazy Load” through performance plugins like WP Rocket, you ensure that images and iframes are only loaded as they become visible, enhancing site speed significantly.
To truly boost site performance, embracing the “Lazy Loading” technique is crucial. With this hack, unnecessary loading at the bottom of the page becomes a thing of the past. By enabling this feature in your performance tools, such as WP Rocket, you streamline the user experience and underline your commitment to optimization.
Hack 5: Stripping the “Invisible” Weight (EXIF Data)
To enhance site performance and implement effective Image Optimization Hacks, it is crucial to address the “Invisible” weight carried by photos due to hidden EXIF data. This data, including GPS coordinates, camera details, and timestamps, can inflate file sizes by 5–15%, impacting loading speeds. A smart solution lies in enabling the “Strip Metadata” feature within your optimization plugin, effectively shedding this unnecessary digital baggage.
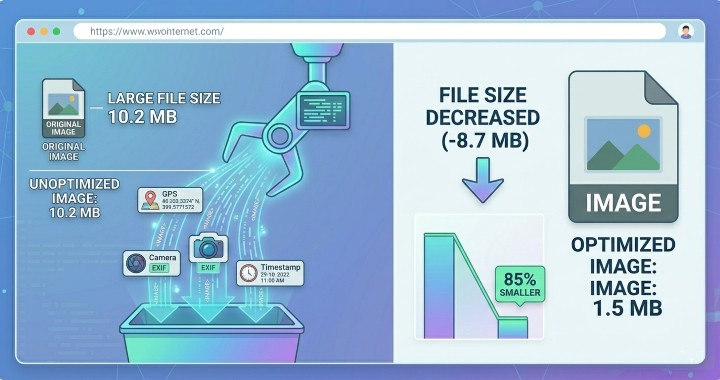
By stripping EXIF data through this simple yet powerful method, you can significantly reduce image file sizes, leading to quicker load times and improved overall site performance. Embracing this optimization hack not only streamlines your website’s efficiency but also ensures a smoother user experience by enhancing loading speeds. Optimize your images smartly to boost your site’s performance and elevate user satisfaction.
Hack 6: Offloading to the “Edge” (CDNs)
Offloading to the “Edge” through CDNs like Bunny.net or Cloudflare Enterprise is a smart strategy to enhance site performance and decrease loading times significantly. By leveraging CDNs, such as Bunny.net or Cloudflare Enterprise, you can ensure that users across the globe, like those in Pune, can access images swiftly. This optimization hack plays a vital role in reducing latency for users accessing content from servers located far away.
Implementing CDN services in your image optimization strategy can make a remarkable difference in user experience by delivering content from servers that are geographically closer to them. Therefore, by embracing CDNs like Bunny.net or Cloudflare Enterprise, you can efficiently address latency issues and provide a seamless browsing experience for your global audience.
Stay ahead of the curve by incorporating these essential image optimization strategies into your website management arsenal.
Conclusion: Your Image Quality System
For optimal image quality system, the key is to avoid manual optimization. The winning strategy lies in implementing an automated pipeline. This includes converting images to WebP format, applying lossy compression techniques, and setting a limit of 2500px for images.
Embrace the smart admin mantra when it comes to image optimization hacks. Images exceeding 100KB should be reserved for crucial page elements to ensure a seamless user experience. By following these guidelines, you can significantly boost your site’s performance and enhance loading speeds, ultimately providing visitors with a top-notch browsing experience.
FAQs on Image Optimization Hacks
Not if you use Smart Compression. WebP is designed to maintain high visual quality at much lower bitrates. Most users (and even designers) cannot tell the difference between a high-quality JPEG and a WebP at standard screen resolutions.
Actually, it helps it. Google’s bots are “Smart” enough to understand lazy loading. By only loading images as they are needed, you improve your Largest Contentful Paint (LCP) score, which is a major ranking factor in 2026. Just ensure you don’t lazy load your “Above the Fold” hero image, as that should appear instantly.
A Smart Admin aims for under 100KB per image. If an image is purely decorative, try to get it under 50KB. Only high-resolution hero images or detailed infographics should ever cross the 150KB mark.
Distance matters. No matter how fast your server is, data cannot travel faster than the speed of light. A CDN (Content Delivery Network) places a copy of your images on hundreds of servers worldwide. If a user is in Tokyo, they get the image from a Tokyo server, not your main server in New York.
While plugins like ShortPixel can do this, it’s a “Smart” habit to resize them before uploading. Uploading massive files wastes your server’s storage space and processing power during the conversion. Use a free tool like Squoosh.app to crop and resize before you hit “Upload.”